Introduction:
In this post we will learn how to build an CURD application with NestJS and MongoDb database using mongoose as an database ORM.
Following are the prerequisite to build this CURD application
- Node JS
- NestJs CLI
- MongoDB database
If not please installed with follow below steps
Installation #
To get started, you can either scaffold the project with the Nest CLI, or clone a starter project (both will produce the same outcome).
$ npm i -g @nestjs/cli
$ nest new project-name
Once installation is done, please verify the install & installed version with the following command
nest --version
Once Nestjs Installed, You will see the following structure under your project name directory.
src
|-app.controller.spec.ts       #The unit tests for the controller.
|-app.controller.ts            #A basic controller with a single route.
|-app.module.ts                #The root module of the application.
|-app.service.ts               #A basic service with a single method.
|-main.ts                 #The entry file of the application which uses the core functions.
NestJs framework is based on the Angular. Who all have knowledge of Angular, can quickly learn this nodejs framework. Its basic routing, folder structure, configuration, naming convention of default files and CLI command are similar to Angular. That’s why this is very easy for those who already worked on Angular.
After installing NestJS lets install other MongoDB and dependencies using the following command.
npm i --save @nestjs/core @nestjs/common rxjs reflect-metadata
npm install --save @nestjs/mongoose mongoose
npm install class-validator --save
npm install class-transformer --save
npm i @nestjs/mapped-types --save
To make it more structured, lets create few more directories under the src like modules and utilities etc. Then lets create first module a User. So the folder structure will be look like below:
src
 modules
     user   #user module
     app.controller.ts
     app.module.ts
     app.service.ts
utilities
You can see above we have create one module as user. Inside the user module we will create more directories like
controllers, dto, interface, schema & services
Once basic project setup is done, We will add the database connection in the imports of the root app module as below
@Module({
  imports: [
    MongooseModule.forRoot('mongodb://localhost:YOURPORT',{dbName: 'DATABASE_NAME'}),
  ],
})
export class AppModule {}
#In case you authenticated database connection use blow connection string
@Module({
  imports: [MongooseModule.forRoot('mongodb://<username>:<password>@localhost:PORT',{dbName: 'DATABASE_NAME'}),
  ],
})
export class AppModule {}
We have created one module as Blog. Lets create the Controller for blog module. You can create this manually or using nest CLI with following command.
$ nest generate <schematic> <name> [options]
$ nest g <schematic> <name> [options]
<schematic> : app, class, controller, interface, module, provider etc
<name>: The name of the generated component.
[options]: --dry-run , --project [project], --flat, --collection  etc
For example to create new controller below command will be used
nest g controller controller-name
Now moving forward to implement the controller. Controller is responsible for request handler. Lets create a controller folder insider the blog directory and create a blog.controller.ts file (nest generate controller blog) for blog module.
Create following directories & files.
Service folder and service file blog.service.ts file (nest generate service blog)
Schema folder and schema files blog.schema.ts file.
Interface folder and file blog.interface.ts in.
DTO folder and files. We are using to DTO file for blog module a create.blog.dto.ts and update.blog.dto.ts
Create a Mongoose Schema:
In your NestJS project, create a directory for your data models, typically in a models or schemas folder. Inside this directory, create a Type Script file for your schema definition. For example, let’s create a blog.schema.ts file:
// src/module/blog/blog.schema.ts
import { Prop, Schema, SchemaFactory } from '@nestjs/mongoose';
import { Document } from 'mongoose';
@Schema()
export class Blog extends Document {
  @Prop({ required: true })
  title: string;
  @Prop({ required: true })
  content: string;
  @Prop({ required: true })
  author: number;
  // Add more properties as needed
}
export const BlogSchema = SchemaFactory.createForClass(Blog);
In the above code, we have used two NestJS Decorators:
1> Schema: This decorator fixes the class as the schema definition. here whatever name we give this class will appear as the name of the collection. This will map our Student class to the MongoDB Student collection
2> Prop: Basically, this decorator defines a property within the document. For example, in the above schema, we have a total of 5 properties like title, content and author. Using Typescript’s metadata and class reflection, the types for these properties are automatically inferred.
Create a Interface:
After creating mongoose model now we can create an interface for the blog schema, it defines how our data object structure will look like. Now create a new folder interface within the module blog and create the blog.interface.ts file in it. Here interface will inherit property from the mongoose Document class. All the properties are read-only so those can’t be modified.
import { Document } from 'mongoose';
export interface IBlog extends Document{
    readonly title: string;
    readonly content: string;
    readonly author: string;
}
Creating DTO:
We have already installed the dependencies for DTO. So now we will proceed towards creating the DTO files these are useful for defining the object model. DTO file can also be used to define the swagger property. Now create a new folder dto and create-blog.dto.ts file in it. Add all the properties along with the required validations.
import { IsNotEmpty, IsNumber, IsString, MaxLength } from "class-validator";
export class CreateBlogDto {
    @IsString()
    @MaxLength(30)
    @IsNotEmpty()
    readonly title: string;
    @IsString()
    @IsNotEmpty()
    readonly content: string;
    @IsString()
    @MaxLength(100)
    @IsNotEmpty()
    readonly author: string;
}
Create Blog is similar to update blog DTO. So we will use it with partially mapped package. We need to install the following package for the same.
npm i @nestjs/mapped-types --save
Now lets create the update DTO file for blog as update.blog.dto.ts file.
import { PartialType } from '@nestjs/mapped-types';
import { CreateBlogDto } from './create-blog.dto';
export class UpdateBlogDto extends PartialType(CreateBlogDto) {}
Create Service:
Next, you need to create a Mongoose model using your schema. You can do this in a separate service or controller file. For example, let’s create a blog.service.ts file:
nest generate service blog
Once the service file generation is done then we will implement the methods to create, read, update and delete a student document from the underlying blog collection. We will use standard methods available to the blogModel to implement the CRUD operations. After implementing the methods, the student service file will look as below.
import { Injectable, NotFoundException } from '@nestjs/common';
import { InjectModel } from '@nestjs/mongoose';
import { CreateBlogDto } from 'src/dto/create-blog.dto';
import { IBlog } from 'src/interface/blog.interface';
import { Model } from "mongoose";
import { UpdateBlogDto } from 'src/dto/update-blog.dto';
@Injectable()
export class BlogService {
constructor(@InjectModel('Blog') private blogModel:Model<IBlog>) { }
async createBlog(createBlogDto: CreateBlogDto): Promise<IBlog> {
   const newBlog = await new this.blogModel(createBlogDto);
   return newBlog.save();
}
async updateBlog(blogId: string, updateBlogDto: UpdateBlogDto): Promise<IBlog> {
    const existingBlog = await        this.blogModel.findByIdAndUpdate(blogId, updateBlogDto, { new: true });
   if (!existingBlog) {
     throw new NotFoundException(`Blog #${blogId} not found`);
   }
   return existingBlog;
}
async getAllBlogs(): Promise<IBlog[]> {
    const blogData = await this.blogModel.find();
    if (!blogData || blogData.length == 0) {
        throw new NotFoundException('Blogs data not found!');
    }
    return blogData;
}
async getBlog(blogId: string): Promise<IBlog> {
   const existingBlog = await     this.blogModel.findById(blogId).exec();
   if (!existingBlog) {
    throw new NotFoundException(`Blog #${blogId} not found`);
   }
   return existingBlog;
}
async deleteBlog(blogId: string): Promise<IBlog> {
    const deletedBlog = await this.blogModel.findByIdAndDelete(blogId);
   if (!deletedBlog) {
     throw new NotFoundException(`Blog #${blogId} not found`);
   }
   return deletedBlog;
}
}
Creating the Controller:
Now the last step is to implement the controller to create appropriate request handlers to perform the CRUD operations. Create a new folder controller and create a blog.controller.ts file in it by executing the following command.
nest generate controller student
Now lets implement this controller with the standard POST, PUT, DELETE and GET request handlers and perform various operations in it using the BlogService instance to call the appropriate method.
Once the all methods implemented, Controller looks like below.
import { Body, Controller, Delete, Get, HttpStatus, Param, Post, Put, Res } from '@nestjs/common';
import { CreateBlogDto } from 'src/dto/create-blog.dto';
import { UpdateBlogDto } from 'src/dto/update-blog.dto';
import { BlogService } from 'src/service/blog/blog.service';
@Controller('blog')
export class BlogController {
   constructor(private readonly blogService: BlogService) { }
@Post()
   async createBlog(@Res() response, @Body() createBlogDto: CreateBlogDto) {
  try {
    const newBlog = await this.blogService.createBlog(createBlogDto);
    return response.status(HttpStatus.CREATED).json({
    message: 'Blog has been created successfully',
    newBlog,});
 } catch (err) {
    return response.status(HttpStatus.BAD_REQUEST).json({
    statusCode: 400,
    message: 'Error: Blog not created!',
    error: 'Bad Request'
 });
 }
}
@Put('/:id')
async updateBlog(@Res() response,@Param('id') blogId: string,
@Body() updateBlogDto: UpdateBlogDto) {
  try {
   const existingBlog = await this.blogService.updateBlog(blogId, updateBlogDto);
  return response.status(HttpStatus.OK).json({
  message: 'Blog has been successfully updated',
  existingBlog,});
 } catch (err) {
   return response.status(err.status).json(err.response);
 }
}
@Get()
async getBlogs(@Res() response) {
try {
  const blogData = await this.blogService.getAllBlogs();
  return response.status(HttpStatus.OK).json({
  message: 'All blogs data found successfully',blogData,});
 } catch (err) {
  return response.status(err.status).json(err.response);
 }
}
@Get('/:id')
async getBlog(@Res() response, @Param('id') blogId: string) {
 try {
    const existingBlog = await
this.blogService.getBlog(blogId);
    return response.status(HttpStatus.OK).json({
    message: 'Blog found successfully',existingBlog,});
 } catch (err) {
   return response.status(err.status).json(err.response);
 }
}
@Delete('/:id')
async deleteBlog(@Res() response, @Param('id') blogId: string)
{
  try {
    const deletedBlog = await this.blogService.deleteBlog(blogId);
    return response.status(HttpStatus.OK).json({
    message: 'Blog deleted successfully',
    deletedBlog,});
  }catch (err) {
    return response.status(err.status).json(err.response);
  }
 }
}
Now we have update our app.module.ts file and look like as below.
import { Module } from '@nestjs/common';
import { MongooseModule } from '@nestjs/mongoose';
import { AppController } from './app.controller';
import { AppService } from './app.service';
import { BlogController } from './controller/blog/blog.controller';
import { BlogSchema } from './schema/blog.schema';
import { BlogService } from './service/blog/blog.service';
@Module({
  imports:[MongooseModule.forRoot('mongodb://localhost:27017/studentdb'),
MongooseModule.forFeature([{ name: 'blog', schema: BlogSchema }])],
  controllers: [AppController,BlogController],
  providers: [AppService,BlogService],
})
export class AppModule {}
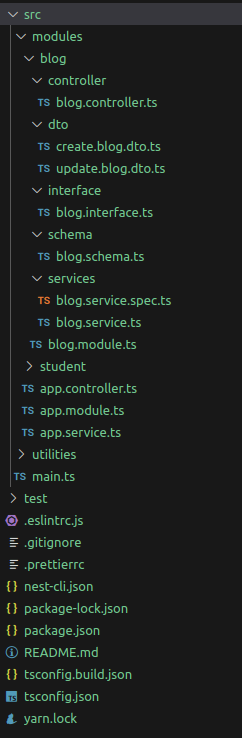
After creating all the files our application code structure will be as follows.
Now its time to test your application. Start the application with below command.
yarn run start
    OR
npm run start
#Application will be open on http://localhost:3000
You can get the complete code from github repo.
Thanks & Enjoy